이 포스트에서는 아래의 저장소 소스코드를 토대로 통해 전장의 안개를 구현하는 한 가지 방법을 제시한다.
https://github.com/LeLocTai/Fog-of-war
GitHub - LeLocTai/Fog-of-war
Contribute to LeLocTai/Fog-of-war development by creating an account on GitHub.
github.com
필요 지식
이 포스트를 읽기 전에 Field Of View를 구현하는 방법을 알고 있어야 한다. 위의 저장소가 Field Of View 구현을 기반으로 안개를 구현하고 있기 때문이다. 아래 시리즈를 보지 않았으면 먼저 공부하도록 한다.
https://nicotina04.tistory.com/197
https://nicotina04.tistory.com/198
https://nicotina04.tistory.com/199
Projector
처음부터 하기 위해 프로젝트를 하나 만들자. Field Of View 코드는 필수로 가져오도록 한다. 캐릭터 이동 코드는 이전의 것을 가져오거나 다시 원하는 형태로 만들어도 상관없다.
전장의 안개를 위해선 프로젝터가 필요하다. 프로젝터를 간단하게 설명하면 머터리얼을 투과할 수 있는 컴포넌트인데 이 포스트에서는 전장의 안개를 위한 응용을 위주로 다룬다.
프로젝터에 대한 자세한 설명은 공식 docs를 참고하자.
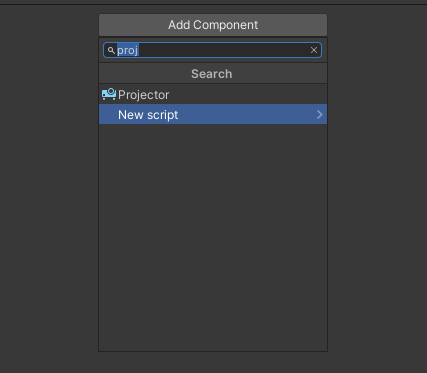
빈 오브젝트를 만들고 프로젝터를 추가해보자.
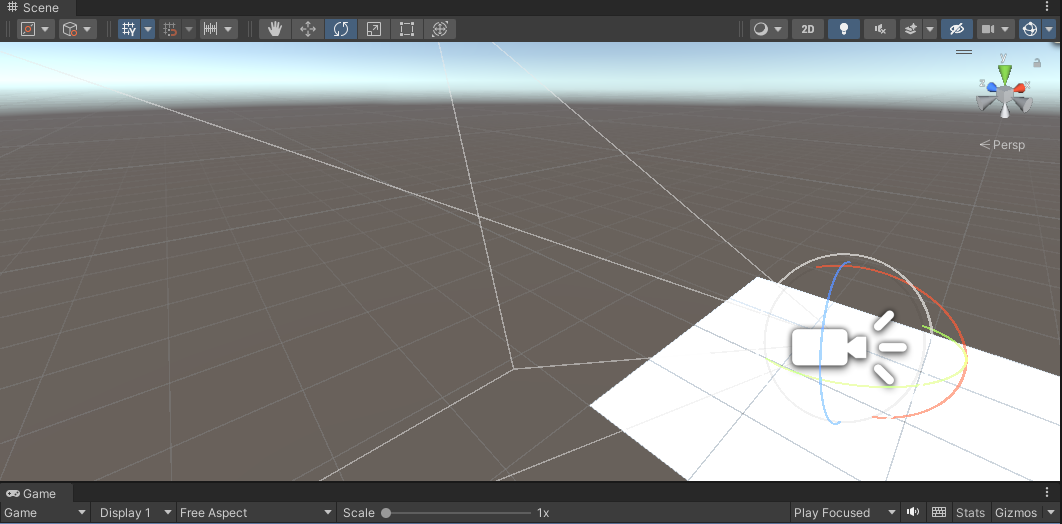
그러면 perspective view가 생성되는 것을 확인할 수 있는데 저 view로 머터리얼이 투과될 것이다.
프로젝터에게 아무 머터리얼을 씌우고 이리저리 물체를 비춰보자.
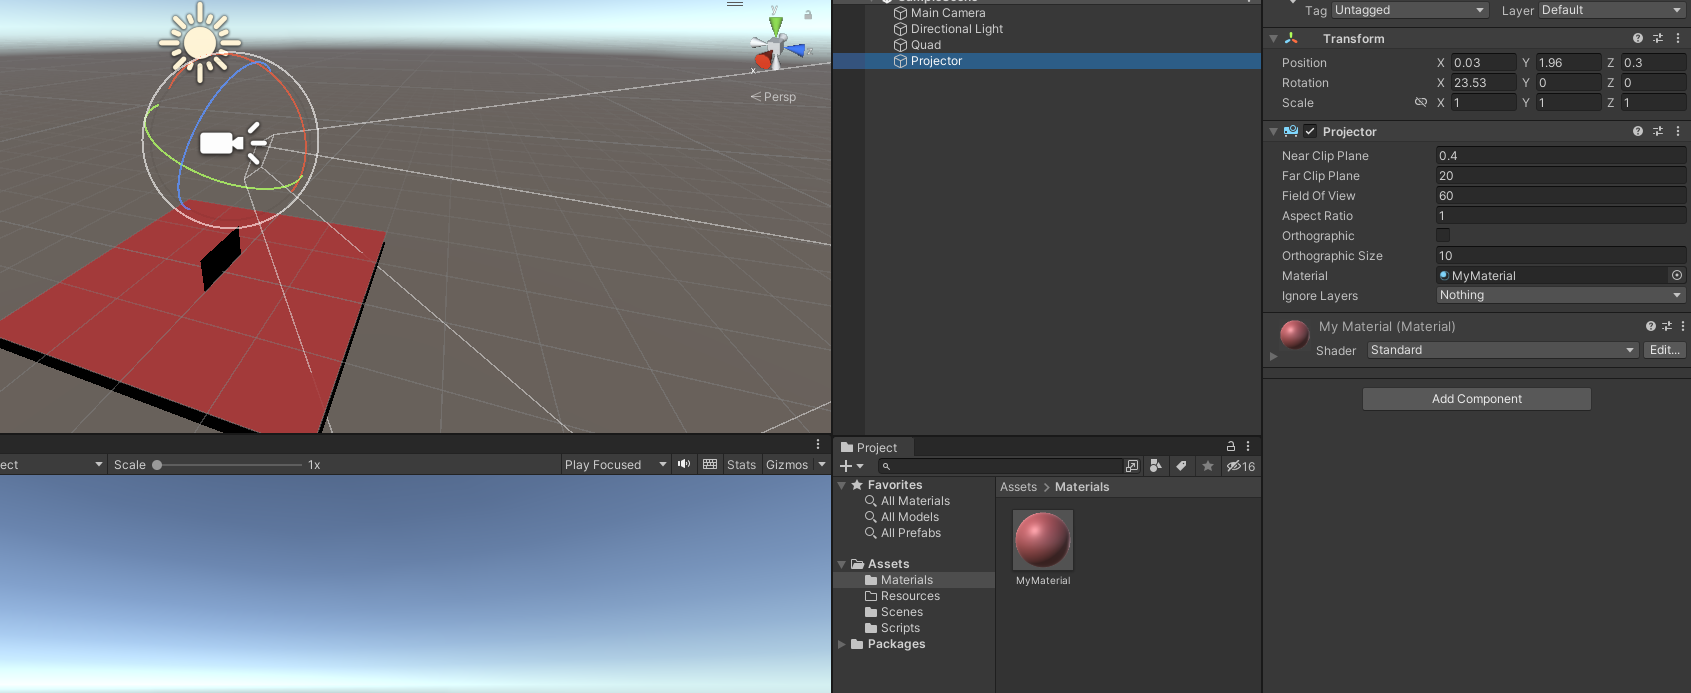
그러면 view에 닿기만 해도 머터리얼이 오브젝트 전체에 투과가 된다.
사실 우리가 생각하는 건 닿은 부분만 머터리얼이 씌워지는 것일 텐데 왜 전체가 물드는 것일까?
사실은 프로젝터 전용 셰이더가 있고 텍스처 이미지에 알파 값이 있어야 한다 등 여러 조건이 필요하다.
Unity Projector 사용시 유의사항
https://answers.unity.com/questions/959468/projector-fills-entire-projected-surface.htmlhttps://docs.unity3d.com/kr/current/Manual/class-Pro
velog.io
프로젝트 셰이더 코드
https://m.blog.naver.com/ateliersera/221550475631
Unity3D - Projector ( Add, Alphablend, Multiply) shader
프로젝터용 쉐이더 입니다. 오래전에 한번 포스팅 한 적이 있었으나,버젼도 바뀌었고, 각각 블랜드 모드 마...
blog.naver.com
근데 지금은 이거 몰라도 전장의 안개를 구현할 수 있으니 시간 남을 때 천천히 보고 지금은 전장의 안개를 위한 세팅을 해보자.
Shader for Projector
프로젝터에서 영사할 머터리얼을 만들자. 색은 까맣게 하는 거 잊지 말자.
그리고 이 머터리얼에 적용할 전용 셰이더 코드를 작성해야 한다. 셰이더 코드는 저장소 코드의 것을 그대로 사용하도록 하자.
// Upgrade NOTE: replaced 'mul(UNITY_MATRIX_MVP,*)' with 'UnityObjectToClipPos(*)'

// Upgrade NOTE: replaced '_Projector' with 'unity_Projector'
// Upgrade NOTE: replaced '_ProjectorClip' with 'unity_ProjectorClip'

Shader "Projector/Fog Of War" {
	Properties {
		_OldFogTex ("Old Fog Texture", 2D) = "gray" {}
		_FogTex ("Fog Texture", 2D) = "gray" {}
		_Color ("Color", Color) = (0,0,0,0)
	}
	Subshader {
		Tags {"Queue"="Transparent"}
		Pass {
			ZWrite Off
			Blend DstColor Zero
			Offset -1, -1

			CGPROGRAM
			#pragma vertex vert
			#pragma fragment frag
			#pragma multi_compile_fog
			#include "UnityCG.cginc"

			struct v2f {
				float4 uvShadow : TEXCOORD0;
				UNITY_FOG_COORDS(2)
				float4 pos : SV_POSITION;
			};

			float4x4 unity_Projector;
			float4x4 unity_ProjectorClip;

			v2f vert (float4 vertex : POSITION)
			{
				v2f o;
				o.pos = UnityObjectToClipPos (vertex);
				o.uvShadow = mul (unity_Projector, vertex);
				UNITY_TRANSFER_FOG(o,o.pos);
				return o;
			}

			sampler2D _OldFogTex;
			sampler2D _FogTex;
			fixed4 _Color;
			uniform float _Blend;

			fixed4 frag (v2f i) : SV_Target
			{
				fixed a1 = tex2Dproj (_OldFogTex, UNITY_PROJ_COORD(i.uvShadow)).a;
				fixed a2 = tex2Dproj (_FogTex, UNITY_PROJ_COORD(i.uvShadow)).a;

				fixed a = lerp(a1, a2, _Blend);
				fixed4 col = lerp(_Color, fixed4(1,1,1,1), a);

				UNITY_APPLY_FOG_COLOR(i.fogCoord, col, fixed4(1,1,1,1));
				return col;
			}
			ENDCG
		}
	}
}
나는 셰이더를 그렇게 잘 아는 것이 아니기 때문에 해당 셰이더 코드에서 중요한 점 위주로 짚고 넘어가도록 한다.
ZWrite Off: 어두운 안개는 모든 물체를 가릴 것이므로 z 버퍼를 관리할 필요가 없다. 따라서 Off 해버리도록 한다.
https://darkcatgame.tistory.com/31
Unity Shader - Alpha 이론 & 문제 해결
게임을 만드는데 있어서 반투명 그래픽은 필수적이며 여러가지 활용하는 곳이 많습니다, 반투명이라는 것은 뒤의 픽셀과 블렌딩(Blending)된다는 의미입니다. 이번 포스팅에서는 알파에 관한 이
darkcatgame.tistory.com
Blend DstColor Zero: 유니티 공식 docs에서 Multiplicative를 하는 블렌드 타입이라 소개하고 있다. Multiplicative 셰이더는 RGB의 검은 영역을 하얗게 바꿔준다고 한다.
자세한 것은 이 포스트의 "커스텀 알파 블렌딩" 부분을 참조하도록 하자.
https://rito15.github.io/posts/unity-transparent-stencil/
유니티 반투명, 스텐실 개념 익히기
목차
rito15.github.io
아래의 블로그는 각 블렌드 타입의 특징을 확인하기 좋다.
https://blog.naver.com/PostView.naver?isHttpsRedirect=true&blogId=spoonpen&logNo=222045266139
블렌딩 ShaderLab: Blending | 유니티 쉐이더
유니티 쉐이더랩 (ShaderLab) 블렌딩에 대해 살펴보겠습니다. 블렌딩은 투명 오브젝트를 만드는데 사용됩...
blog.naver.com
UnityCG.cginc: 유니티의 빌트인 셰이더다. 여기서 UNITY_FOG_COORDS 같은 함수를 제공하는데 전장의 안개와 관련된 함수를 설명한 스레드가 있으니 참고하면 좋다.
https://answers.unity.com/questions/981538/shaders-what-is-the-use-of-unity-fog-coords-unity.html
shaders : what is the use of UNITY_FOG_COORDS, UNITY_TRANSFER_FOG, UNITY_APPLY_FOG - Unity Answers
answers.unity.com
그리고 frag 함수를 보면 텍스처 두 개를 받아 lerp()로 섞고 있는데 이는 안개의 잔상을 남기기 위함이다. 뭔지 잘 감이 오지 않으면 깃허브 저장소의 main 신을 실행해서 확인해보자.
아무튼 우리는 셰이더를 준비했다. 우리가 사용할 머터리얼에 적용하자.
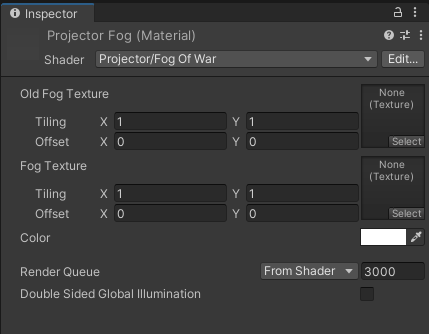
그러면 위와 같이 Old Fog, Fog 두 텍스처를 요구하는 머터리얼이 된다. 저 텍스처에는 RenderTexture를 넣어줄 것이다.
렌더 텍스처는 카메라로 렌더링 된 상을 텍스처에 담은 것으로 설명할 수 있다. 렌더 텍스처를 왜 쓰냐면 프로젝터는 안개를 영사하고 렌더 카메라는 field of view 메시를 상에 담아 둘을 섞어서 전장의 안개를 구현할 것이기 때문이다.
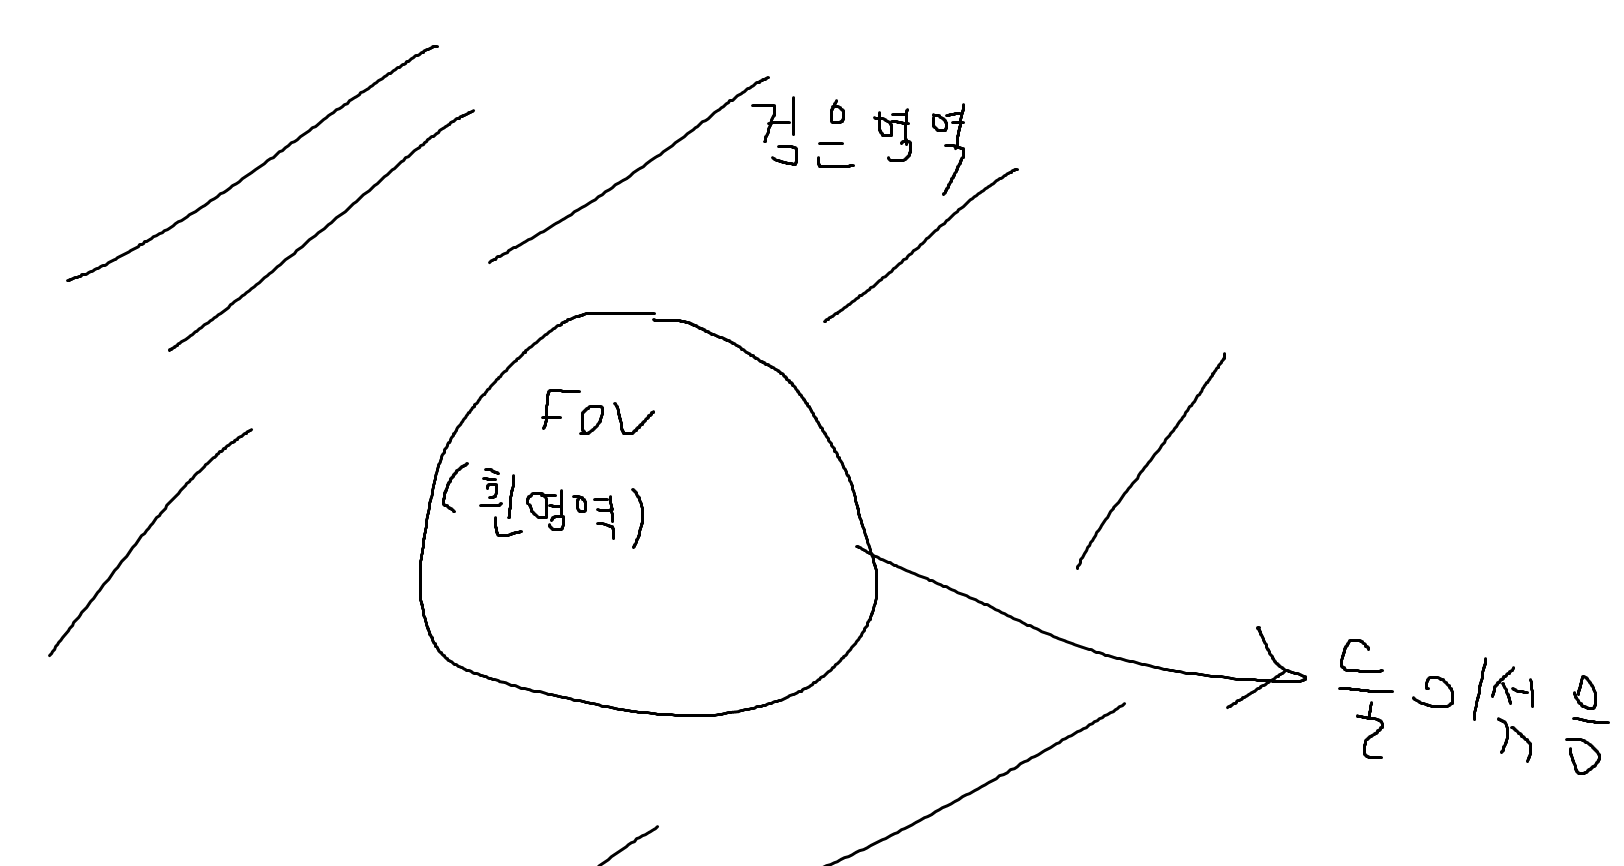
Field of View의 흰 영역이 정확히 어떤 것을 의미하는지 이해하지 못할 수 있는데 뒤에서 설명한다.
그러므로 적당한 위치에 렌더 텍스처를 만들도록 하자.
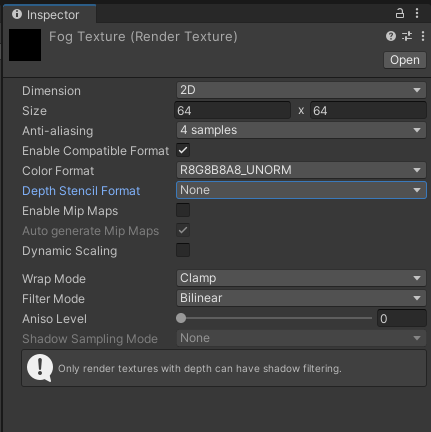
설정은 위처럼 하면 된다. 지금은 이 텍스처를 바로 머터리얼에 씌우지 않고 코드에서 로드할 것이다.
프로젝터 및 렌더 카메라 배치
이제 높은 하늘에서 안개를 쏠 프로젝터와 그를 담을 카메라를 만들자.
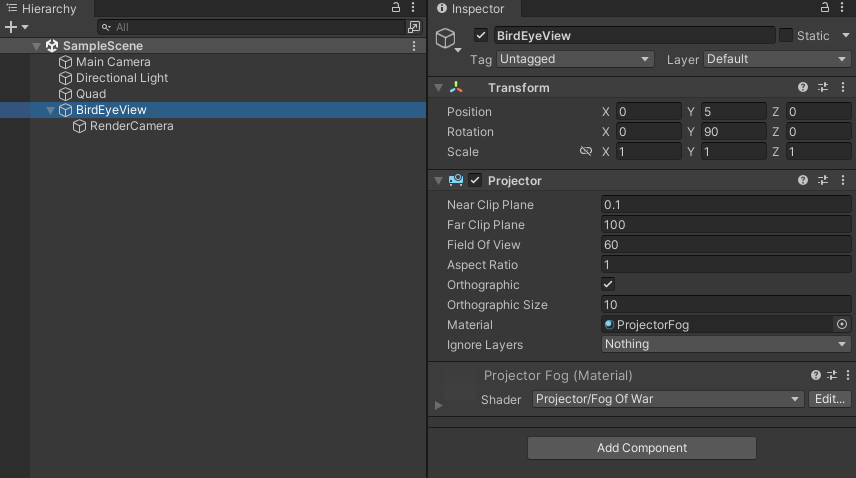
Orthographic 옵션을 켜고 Material은 우리가 만들었던 머터리얼을 지정한다. 나머지는 적당히 크기에 맞게 해주자.
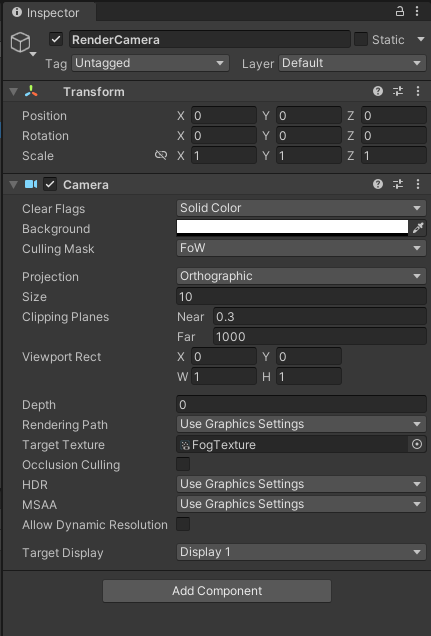
렌더 카메라는 사이즈와 클리핑 플레인을 프로젝터와 같게 만든다. 그리고 Clear Flags를 Solid Color로 설정해야 한다.(당연히 안개를 투사하는 거라 스카이 박스가 있으면 안 되므로) 배경색은 눈에 아프지 않은 색으로 둔다.
그리고 중요한 것이 컬링 마스크인데 이는 전장의 안개 전용 레이어를 만들어 컬링 마스크로 지정해야 한다. 그래야 field of view로 생성된 메쉬만 상에 담을 수 있기 때문이다.
그리고 타깃 텍스처를 우리가 만들었던 렌더 텍스처로 지정하여 렌더링 된 상이 렌더 텍스처에 갈 수 있도록 하자.
그리고 field of view 메시를 하얗게 만들기 위해 렌더 카메라의 셰이더를 바꿀 것이다.
원래 저장소에서는 Solidify라는 이름의 스크립트 컴포넌트가 렌더 카메라에 붙어 셰이더를 바꾸는 역할을 한다.
using System.Collections;
using System.Collections.Generic;
using UnityEngine;

[ExecuteInEditMode]
public class Solidify : MonoBehaviour
{
    public Shader flatShader;
    Camera cam;
	void OnEnable ()
	{
	    cam = GetComponent<Camera>();
        cam.SetReplacementShader(flatShader, "");
	}

}
SetReplacementShader라는 메서드에 의해 flatShader로 바꾸는데 여기서 바꿀 셰이더는 유니티 기본 셰이더의 Color 셰이더이다. Color 셰이더는 기본 RGB 값이 (1, 1, 1)이라 보이는 모든 오브젝트가 하얀색으로 바뀐다.
앞서 그림으로 보여준 field of view 메시가 왜 흰 영역이라고 했는지 이해할 수 있을 것이다.
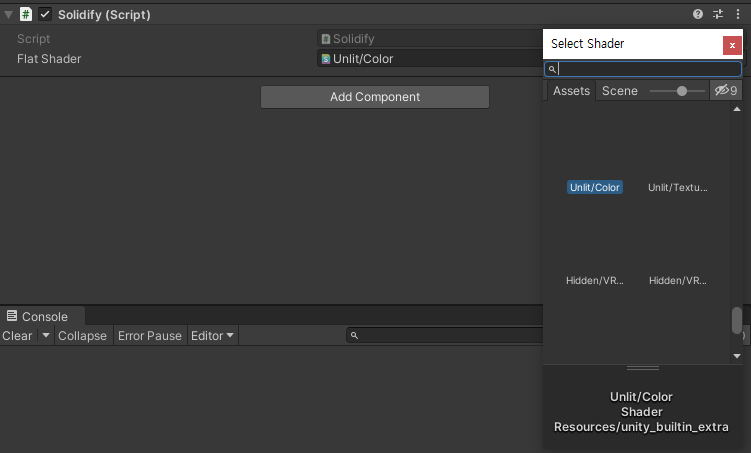
렌더 카메라에 해당 코드를 추가하고 FlatShader에 Color를 지정해주자.
프로젝터로 안개 쏘기
이제 본격적으로 전장의 안개를 구현하는 코드를 만들자. 이 포스트에서는 코드를 다시 쓰는 대신 저장소에 있는 코드에 주석을 붙여 해설한다.
FogProjector는 다음과 같이 작성되어 있다.
using System.Collections;
using System.Collections.Generic;
using UnityEngine;

public class FogProjector : MonoBehaviour
{
    // 렌더 텍스처
    public RenderTexture fogTexture;

    // 잔상 표현을 위한 두 렌더 텍스처
    RenderTexture projecTexture;
    RenderTexture oldTexture;

    // 전장의 안개와 시야를 블러 셰이더로 섞어 자연스러운 모습을 연출해야 한다.
    // 지금은 아직 언급하지 않았다.
    public Shader blurShader;

    [Range(1, 4)]
    public int upsample = 2;

    Material blurMaterial;
    public float blur=1;

    Projector projector;

    public float blendSpeed = 1;
    float blend;
    int blendNameId;

    void OnEnable()
    {
        projector = GetComponent<Projector>();

        // 블러 셰이더를 적용한 머터리얼 생성
        blurMaterial = new Material(blurShader);
        blurMaterial.SetVector("_Parameter", new Vector4(blur, -blur, 0, 0));

        // 새로운 렌더 텍스처 객체 생성
        // 필터 모드는 Bilinear로 똑같이 맞춰준다.
        projecTexture = new RenderTexture(
                            fogTexture.width * upsample,
                            fogTexture.height * upsample,
                            0,
                            fogTexture.format) {filterMode = FilterMode.Bilinear};

        oldTexture = new RenderTexture(
                        fogTexture.width * upsample,
                        fogTexture.height * upsample,
                        0,
                        fogTexture.format) {filterMode = FilterMode.Bilinear};

        // 두 텍스처를 각각 _FogTex, _OldFogTex에 할당하도록 한다.
        projector.material.SetTexture("_FogTex", projecTexture);
        projector.material.SetTexture("_OldFogTex", oldTexture);

        // 셰이더의 _Blend 변수를 연결하고 현재 안개 텍스처를 projectTexture로 옮긴다.
        blendNameId = Shader.PropertyToID("_Blend");
        blend = 1;
        projector.material.SetFloat(blendNameId, blend);
        Graphics.Blit(fogTexture, projecTexture);
        UpdateFog();
    }

    // 두 텍스처를 섞어서 잔상을 구현하는 함수
    public void UpdateFog()
    {
        Graphics.Blit(projecTexture, oldTexture);
        Graphics.Blit(fogTexture, projecTexture);

        RenderTexture temp = RenderTexture.GetTemporary(
            projecTexture.width,
            projecTexture.height,
            0,
            projecTexture.format);

        temp.filterMode = FilterMode.Bilinear;

        Graphics.Blit(projecTexture, temp, blurMaterial, 1);
        Graphics.Blit(temp, projecTexture, blurMaterial, 2);

        StartCoroutine(Blend());

        RenderTexture.ReleaseTemporary(temp);
    }

    // 코루틴으로 텍스처를 섞는 과정을 자연스럽게 구현한다.
    IEnumerator Blend()
    {
        blend = 0;
        projector.material.SetFloat(blendNameId, blend);
        while (blend < 1)
        {
            blend = Mathf.MoveTowards(blend, 1, blendSpeed * Time.deltaTime);
            projector.material.SetFloat(blendNameId, blend);
            yield return null;
        }
    }
}
유니티에서 머터리얼이나 셰이더 등 렌더링을 다루는 코드에 익숙하지 않으면 처음 이해에 난항을 겪을 수 있다. 하지만 함수들의 용도는 모두 검색을 통해 제공하고 있으니 시간을 잡고 천천히 분석하면 이해할 수 있을 것이다.
주석을 보면 블러가 나오는데 용도는 field of view로 확보된 시야와 안개의 경계를 잘 섞어 부드럽게 보이도록 하는 역할을 담당한다.(field of view를 볼 때 시야 영역이 원이 아닌 다각형이므로 블러 셰이더를 적용하지 않으면 울퉁불퉁하게 보인다.)
그리고 이 블러 셰이더는 유니티 스탠다드 에셋에 있던 것으로 보이는데 지금은 내려갔다. 그래서 따로 구해서 써야 하는데 밑에 첨부하니 잘 쓰면 된다.
// Upgrade NOTE: replaced 'mul(UNITY_MATRIX_MVP,*)' with 'UnityObjectToClipPos(*)'


Shader "Hidden/FastBlur" {
	Properties {
		_MainTex ("Base (RGB)", 2D) = "white" {}
		_Bloom ("Bloom (RGB)", 2D) = "black" {}
	}

	CGINCLUDE

		#include "UnityCG.cginc"

		sampler2D _MainTex;
		sampler2D _Bloom;

		uniform half4 _MainTex_TexelSize;
		half4 _MainTex_ST;

		half4 _Bloom_ST;

		uniform half4 _Parameter;


		struct v2f_tap
		{
			float4 pos : SV_POSITION;
			half2 uv20 : TEXCOORD0;
			half2 uv21 : TEXCOORD1;
			half2 uv22 : TEXCOORD2;
			half2 uv23 : TEXCOORD3;
		};

		v2f_tap vert4Tap ( appdata_img v )
		{
			v2f_tap o;

			o.pos = UnityObjectToClipPos (v.vertex);
        	o.uv20 = UnityStereoScreenSpaceUVAdjust(v.texcoord + _MainTex_TexelSize.xy, _MainTex_ST);
			o.uv21 = UnityStereoScreenSpaceUVAdjust(v.texcoord + _MainTex_TexelSize.xy * half2(-0.5h,-0.5h), _MainTex_ST);
			o.uv22 = UnityStereoScreenSpaceUVAdjust(v.texcoord + _MainTex_TexelSize.xy * half2(0.5h,-0.5h), _MainTex_ST);
			o.uv23 = UnityStereoScreenSpaceUVAdjust(v.texcoord + _MainTex_TexelSize.xy * half2(-0.5h,0.5h), _MainTex_ST);

			return o;
		}

		fixed4 fragDownsample ( v2f_tap i ) : SV_Target
		{
			fixed4 color = tex2D (_MainTex, i.uv20);
			color += tex2D (_MainTex, i.uv21);
			color += tex2D (_MainTex, i.uv22);
			color += tex2D (_MainTex, i.uv23);
			return color / 4;
		}

		// weight curves

		static const half curve[7] = { 0.0205, 0.0855, 0.232, 0.324, 0.232, 0.0855, 0.0205 };  // gauss'ish blur weights

		static const half4 curve4[7] = { half4(0.0205,0.0205,0.0205,0), half4(0.0855,0.0855,0.0855,0), half4(0.232,0.232,0.232,0),
			half4(0.324,0.324,0.324,1), half4(0.232,0.232,0.232,0), half4(0.0855,0.0855,0.0855,0), half4(0.0205,0.0205,0.0205,0) };

		struct v2f_withBlurCoords8
		{
			float4 pos : SV_POSITION;
			half4 uv : TEXCOORD0;
			half2 offs : TEXCOORD1;
		};

		struct v2f_withBlurCoordsSGX
		{
			float4 pos : SV_POSITION;
			half2 uv : TEXCOORD0;
			half4 offs[3] : TEXCOORD1;
		};

		v2f_withBlurCoords8 vertBlurHorizontal (appdata_img v)
		{
			v2f_withBlurCoords8 o;
			o.pos = UnityObjectToClipPos (v.vertex);

			o.uv = half4(v.texcoord.xy,1,1);
			o.offs = _MainTex_TexelSize.xy * half2(1.0, 0.0) * _Parameter.x;

			return o;
		}

		v2f_withBlurCoords8 vertBlurVertical (appdata_img v)
		{
			v2f_withBlurCoords8 o;
			o.pos = UnityObjectToClipPos (v.vertex);

			o.uv = half4(v.texcoord.xy,1,1);
			o.offs = _MainTex_TexelSize.xy * half2(0.0, 1.0) * _Parameter.x;

			return o;
		}

		half4 fragBlur8 ( v2f_withBlurCoords8 i ) : SV_Target
		{
			half2 uv = i.uv.xy;
			half2 netFilterWidth = i.offs;
			half2 coords = uv - netFilterWidth * 3.0;

			half4 color = 0;
  			for( int l = 0; l < 7; l++ )
  			{
				half4 tap = tex2D(_MainTex, UnityStereoScreenSpaceUVAdjust(coords, _MainTex_ST));
				color += tap * curve4[l];
				coords += netFilterWidth;
  			}
			return color;
		}


		v2f_withBlurCoordsSGX vertBlurHorizontalSGX (appdata_img v)
		{
			v2f_withBlurCoordsSGX o;
			o.pos = UnityObjectToClipPos (v.vertex);

			o.uv = UnityStereoScreenSpaceUVAdjust(v.texcoord.xy, _MainTex_ST);

			half offsetMagnitude = _MainTex_TexelSize.x * _Parameter.x;
			o.offs[0] = UnityStereoScreenSpaceUVAdjust(v.texcoord.xyxy + offsetMagnitude * half4(-3.0h, 0.0h, 3.0h, 0.0h), _MainTex_ST);
			o.offs[1] = UnityStereoScreenSpaceUVAdjust(v.texcoord.xyxy + offsetMagnitude * half4(-2.0h, 0.0h, 2.0h, 0.0h), _MainTex_ST);
			o.offs[2] = UnityStereoScreenSpaceUVAdjust(v.texcoord.xyxy + offsetMagnitude * half4(-1.0h, 0.0h, 1.0h, 0.0h), _MainTex_ST);

			return o;
		}

		v2f_withBlurCoordsSGX vertBlurVerticalSGX (appdata_img v)
		{
			v2f_withBlurCoordsSGX o;
			o.pos = UnityObjectToClipPos (v.vertex);

			o.uv = half4(UnityStereoScreenSpaceUVAdjust(v.texcoord.xy, _MainTex_ST),1,1);

			half offsetMagnitude = _MainTex_TexelSize.y * _Parameter.x;
			o.offs[0] = UnityStereoScreenSpaceUVAdjust(v.texcoord.xyxy + offsetMagnitude * half4(0.0h, -3.0h, 0.0h, 3.0h), _MainTex_ST);
			o.offs[1] = UnityStereoScreenSpaceUVAdjust(v.texcoord.xyxy + offsetMagnitude * half4(0.0h, -2.0h, 0.0h, 2.0h), _MainTex_ST);
			o.offs[2] = UnityStereoScreenSpaceUVAdjust(v.texcoord.xyxy + offsetMagnitude * half4(0.0h, -1.0h, 0.0h, 1.0h), _MainTex_ST);

			return o;
		}

		half4 fragBlurSGX ( v2f_withBlurCoordsSGX i ) : SV_Target
		{
			half2 uv = i.uv.xy;

			half4 color = tex2D(_MainTex, i.uv) * curve4[3];

  			for( int l = 0; l < 3; l++ )
  			{
				half4 tapA = tex2D(_MainTex, i.offs[l].xy);
				half4 tapB = tex2D(_MainTex, i.offs[l].zw);
				color += (tapA + tapB) * curve4[l];
  			}

			return color;

		}

	ENDCG

	SubShader {
	  ZTest Off Cull Off ZWrite Off Blend Off

	// 0
	Pass {

		CGPROGRAM

		#pragma vertex vert4Tap
		#pragma fragment fragDownsample

		ENDCG

		}

	// 1
	Pass {
		ZTest Always
		Cull Off

		CGPROGRAM

		#pragma vertex vertBlurVertical
		#pragma fragment fragBlur8

		ENDCG
		}

	// 2
	Pass {
		ZTest Always
		Cull Off

		CGPROGRAM

		#pragma vertex vertBlurHorizontal
		#pragma fragment fragBlur8

		ENDCG
		}

	// alternate blur
	// 3
	Pass {
		ZTest Always
		Cull Off

		CGPROGRAM

		#pragma vertex vertBlurVerticalSGX
		#pragma fragment fragBlurSGX

		ENDCG
		}

	// 4
	Pass {
		ZTest Always
		Cull Off

		CGPROGRAM

		#pragma vertex vertBlurHorizontalSGX
		#pragma fragment fragBlurSGX

		ENDCG
		}
	}

	FallBack Off
}
이름은 MobileBlur로 저장하면 된다.
만들었던 코드를 프로젝터에 추가해보자.
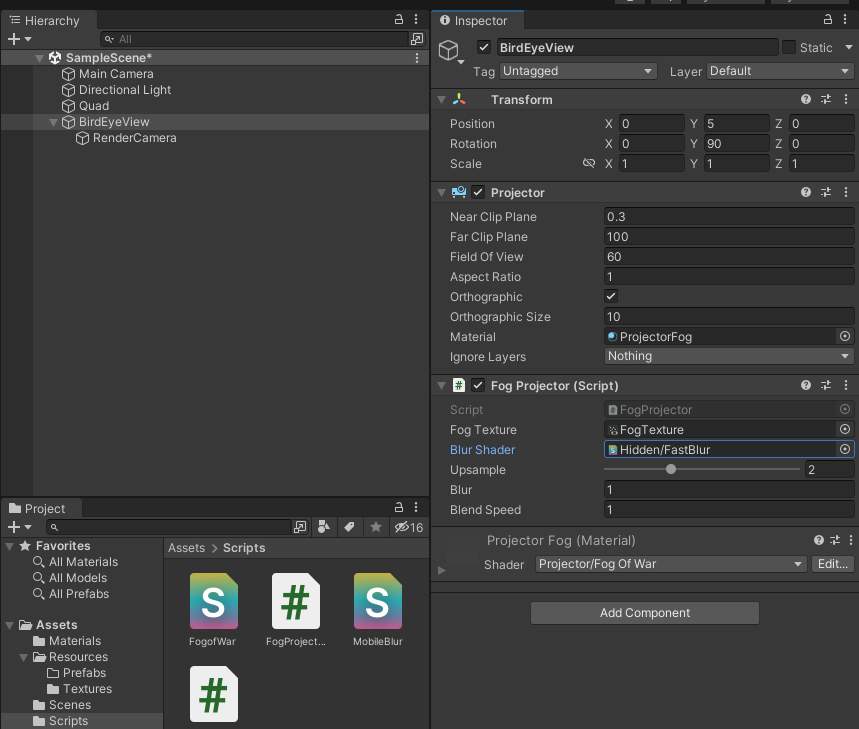
프로젝터가 있던 오브젝트에 코드를 추가하고 텍스처와 블러 셰이더를 지정하면 된다.
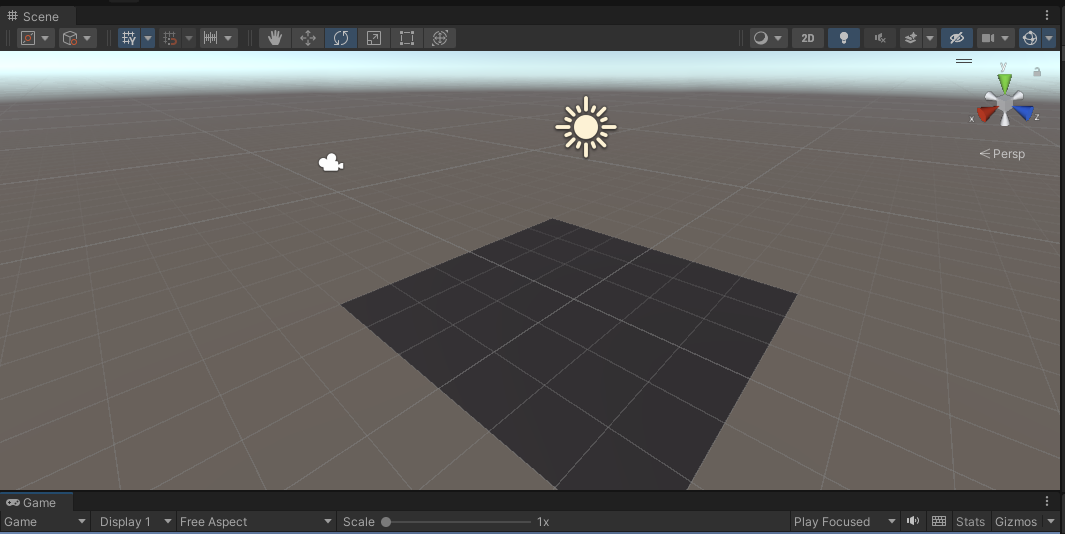
그러고 씬을 실행하면 프로젝터 안에 있는 오브젝트들이 어두워진 것을 볼 수 있다. 전장의 안개 효과가 구현된 것이다.
이제 field of view를 달고 다닐 적당한 오브젝트를 가져다 두고 play를 누르자.
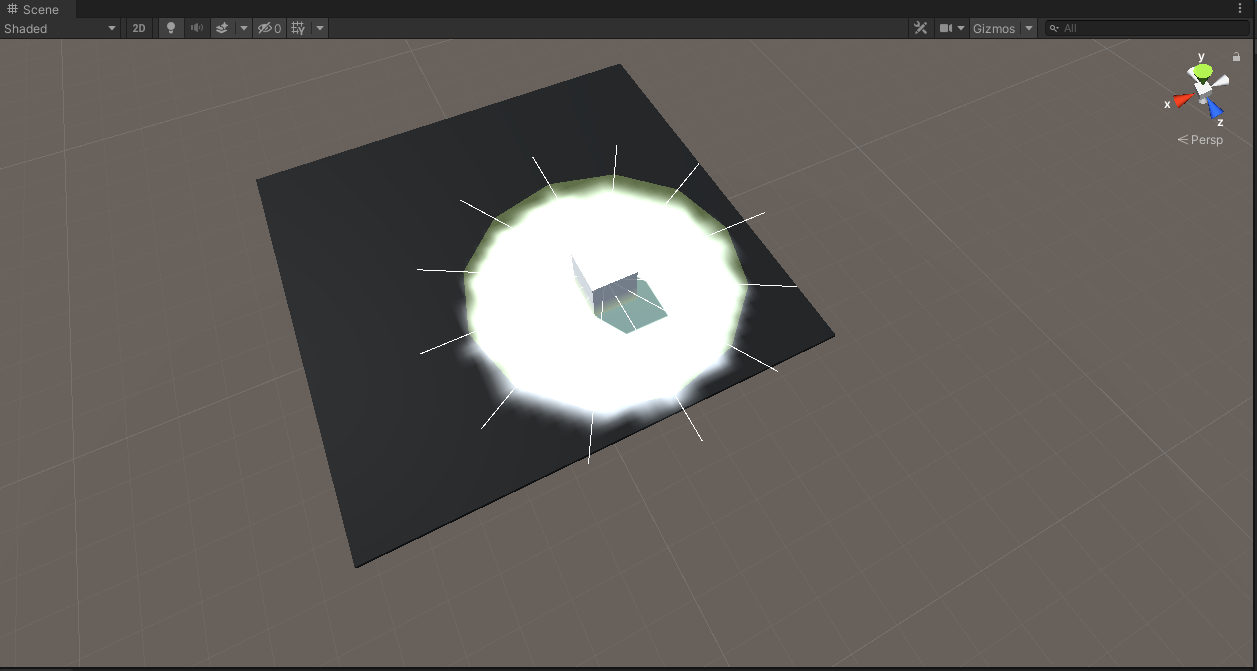
그러면 이렇게 시야가 확보된 전장의 안개를 볼 수 있다.
지금까지 깃허브 저장소를 통해 어떻게 전장의 안개를 구현해야 하는지 알아보았다. 쉽지 않은 내용이지만 잘 익혀두면 큰 도움이 될 수 있을 것이다.
포스트를 한 번에 쭉 쓴 것이 아니라 중간에 매끄럽게 쓰이지 않거나 어긋난 부분이 있을 수 있다. 발견했다면 제보하자!
더보기
만약 스타크래프트처럼 봤던 곳의 안개를 남기길 원할 경우, 아래를 참조하도록 한다.
https://andrewhungblog.wordpress.com/2018/06/23/implementing-fog-of-war-in-unity/
Implementing Attractive Fog of War in Unity
One of the earliest features that I implemented for Gridpulse Legions was fog of war. My intention was for the feature to work similarly to how it works in the original Starcraft; that is to say, i…
andrewhungblog.wordpress.com
'Unity Engine > 자료 번역' 카테고리의 다른 글
| 유니티 Procedural Cave Gerneration 랜덤 동굴 생성 1 (1) | 2022.09.11 |
|---|---|
| Memory Management in Unity 유니티 메모리 관리 번역 (2) | 2022.09.10 |
| 유니티 Field Of View 유닛 시야 구현하기 3 (0) | 2022.03.06 |
| 유니티 Field Of View 유닛 시야 구현하기 2 (0) | 2022.03.04 |
| 유니티 Field Of View 유닛 시야 구현하기 1 (0) | 2022.02.26 |


